Kimberly Loutzenheiser
Interior Design
Throughout this class, we got to utilize the concepts and methods that we have learned about in previous classes. A major portion of the class was focused on the Saffer Home project. We individually got to design the space from what we interpreted from the prompt by the Saffer Family. This class has taught me so much about how to solve design problems by applying design concepts.
Interior Design 2
Professor Garcia
Fall 2023
Mood Board & Concept Statement
Here begins the start of the Saffer home remodel. With the mood board, you can display your thoughts in pictures, as well as a statement of how you perceived their desires. This is all based on what you were given by the Saffer family. I decided to base my design on the Netherlands, a place that they said they enjoyed visiting while keeping a midcentury modern look!


The Design Process
The next phase of this project is the design process. The process that you take at the beginning of any design is very important. There are three main diagrams that you can use: the bubble diagram, the blocking plan, the adjacency matrix, and the mind map. Putting your design in these can come in handy. Being able to see your ideas laid out in order.
Mind Map
The mind map is the beginning of the design process, after you get to speak with the client and start to know what you will be working with this is your first step. Here you get to generate your ideas and begin to connect the relationships within a space that you are trying to achieve.

Adjacency Matrix
This is an exercise that helps to visualize where rooms will be in the space. There are 3 options that you have; convenient, adjacent, and not related. These 3 classifications help organize how the space is used and where they are in relation to each other. For example, the kitchen and the pantry are adjacent to each other, but the pantry and the master bathroom have no relation.

Bubble Diagrams
Next is the bubble diagrams, which are used to have a preview of how to lay out the floor plan. You first look at your adjacency matrix and from there you can create these diagrams. They sort of become rough drafts for you to work through to get the ideal floor plan.


Blocking Diagram
This is the final step in the design process until you start the actual drawing of the plans. Here you take from your bubble diagrams and create a plan that is in your actual floorplan. From this, you get the general idea without making the walls.

Preliminary Floor Plan
Refined Floor Plan
This is the final part of the hand-drafting process. This plan will let you go throughout the model using AutoCAD and get good measurements. Here it is very helpful when it comes to positioning beds and other ADA requirements in small spaces. This is also the final plan to present to your clients, to give them a good understanding of the space.
Next comes the Preliminary floor plan, this is where you draw out your floor plan and begin to add furniture and finalize your walls. Here you can make changes before adding to your final digital floorplan on AutoCAD. The hand-drafted version is such an advantage to the designer as well as the client.


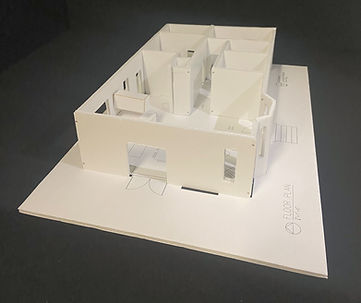
House Model
This Phase is for understanding how a space feels and how the proportions will be. By making a physical model it is easy for us to see how the walls are in proportion to the cabinets and the overall space. For the Saffer home, I found that the laundry needed to be stacked rather than adjacent to each other. This stage is for representation as well as figuring spacing out as well!


FF&E
This stage of the Interior Design process is considered to be the more fun portion. You get to pick out all of the fabrics and place specifics on the appliances as well as the paint colors. This is also the stage where you implement the budget. FF&E stands for Furniture, Fixtures, and equipment. Here you get to display your final ideas to your clients and give them visuals of what the final projects will look like.

As the Saffer Home project ended, we got the opportunity to present everything we had done to the "Saffer Family". This was a great way for us to lay out all of our ideas and see them all go together. What I learned most from this project is that every step of the design process feeds off of each other, and when done correctly, can produce wonderful results,
Saffer Home Final Presentation


For this project, I got the chance to work with some wonderful classmates on a reflected ceiling plan for the Sanders home. We were not given a brief so we got to have free range on the style and fixtures that we chose. we first recognized that this is more of an older style of home and went with a more mid-century modern feel with lots of brass. We got the chance to use our skills in lighting plans that we learned in architectural drafting as well as this class.

Group Lighting Project
Lighting Schedule

Reflected Ceiling Plan
