Kimberly Loutzenheiser
Interior Design
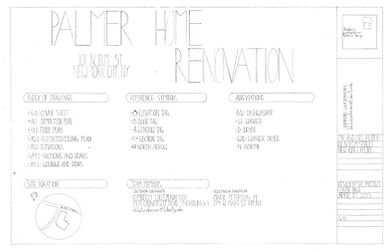
Throughout the class, I got to learn so much about architectural drafting and how to communicate plans on paper. This was by far one of my favorite courses that I have ever taken. For this class, we got the opportunity to remodel the Palmer home. Mr. and Mrs. Palmer live in New York City, NY, and wanted to remodel their one-bedroom apartment. For this project, we learned about and created demolition plans, floor plans, sections, details, and elevations. This was an extremely fun project, and I cannot wait to continue to use this skill in the future.
Architectural Drafting
Fall 2022
Professor Garcia
ADA Restroom
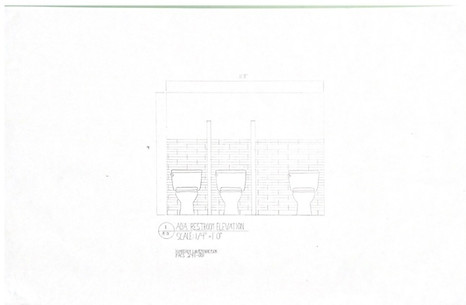
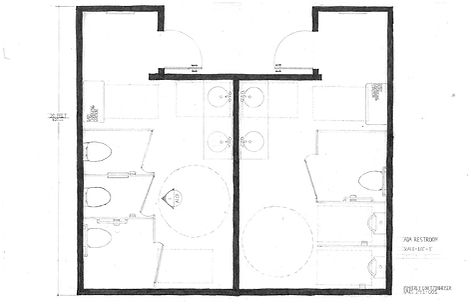
With this assignment, we learned about the ADA and all its standards and requirements. We were asked to create a men's and woman’s restroom, which all need to be compliant with ADA requirements. We learned how to implement 5’ turnarounds for wheelchairs and about the different approaches, these are shown by dashed lines. This assignment taught me about the importance of precise measurements, and the placement of stalls in order to have room for ADA requirements.
Wall Detail
Stair Section
At this point in the course, we had been learning about the different materials and parts of a wall. For this assignment, we recreated a wall type from the James Hardie Company. We got to incorporate hatching and add texture to help communicate the different parts of the wall. Through this, it is easier for the client to understand how the wall will be constructed, and if there are any details that have been added.
This assignment was extremely helpful to me, I learned so much about how stairs work and how they are created. I think that the complexity of them can be a bit intimidating, but once I finished this assignment, I feel like I have a much better grasp on how I can use them in a design and how I can use them in the best way. We were asked to recreate a stair section and utilize line weights in the drawings to create depth and represent different plane changes with the stairs. Overall, I think this was a very productive project.


Palmer Home - Residential Project
Here we learned how to create our own cover sheet for the Palmer home renovation. The cover sheet is the first thing that a client or contractor sees when they look at these plans, so it is important for them to be neat. Here you put the title and all the relevant information to the project which also consists of the team members and their contact information. This is a very important part of any plan set.
Demolition Plan
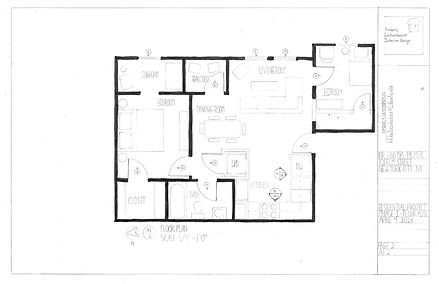
Floor Plan
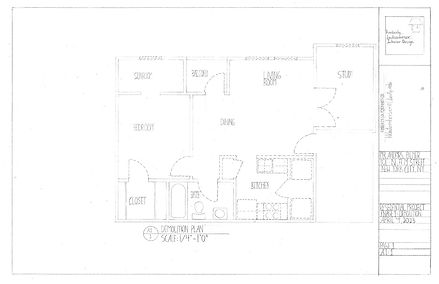
Phase 1 also included the Floor plan. This was mainly the part where we got to design our own furniture layout and figure out the placement of each room. The Main floor plan also shows what was changed with the demolition plan. New lines are brought in to indicate the walls and anything else that has been demolished or replaced.
Phase 1 of our residential project began with the demolition plan. With this plan, we recreated the given floor plan on a 1/4” scale. To show which part of the floor plan will be taken out, we used dashed lines. This plan is used to help the client and contractor understand which parts will be demolished.
Reflected Ceiling Plan
Elevations
Phase 2 was the RCP, also known as the reflected ceiling plan. At this point, we had just learned all about RCPs and the ways that they are used in plans to show clients and contractors where the lighting will be placed in the home. Something that I recognized in this assignment is the importance of making note of the ceiling height, and the angles of the room when placing your lighting fixtures. We also got to utilize different types of switches and lighting fixtures.
Phase 3 was where we got to create kitchen elevations for the Palmer home. The elevations of a plan become important when it comes to showing the client the details of that space and what it will eventually look like. For this assignment, we got to choose and apply the different materials that we would think would best fit the design that the client is looking for. By using line weights, it was easy to show the different plane changes in the design, and with labels, we got to show the different materials that were used.


Doors & Windows
Sections & Details
Phase 5 of the residential project was the doors and windows. Here we got to design the different door types and window type that was to be in the house. We got to learn all about the different types of windows, and from that we choose which we would use and draw for the residential project.
For Phase 4 of this project, we drew out the sections and details in the design. With the sections, it shows the client and contractors what the cabinetry would look like if you cut through the middle of them. This is where you can show the different shelving and materials used for each cabinet. The details, include the beam cut, how it would be aligned in space, and the crown molding. The sections and details page is super helpful when it comes to displaying small designs and details to your clients and contractors.


Isometric Projection
For this assignment, we got to learn about how to use Isometric projection to express different 3D drawings to clients. First, we learned how to draw the grid and then we were asked to draw three 3D objects, in different sizes. We got to learn about the different ways that you are to display the lines on the grid when they go behind the object. For instance, the lines must be dashed to indicate the hidden lines.

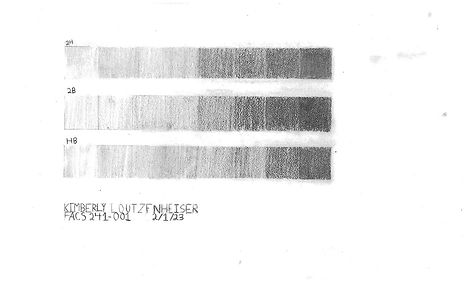
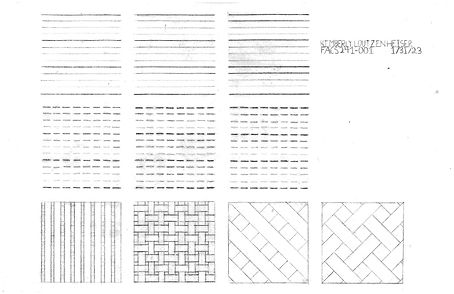
Line Weights Assignment
Line weights in Architectural drafting are extremely important when it comes to interpreting a sheet. They make it easy for clients to see the different layers and how a plan will be projected in real life. For this assignment, we got to practice with the different types of line weights, along with practicing different patterns of weaving. This skill is great to have when trying to interpret plain changes and things of that sort.
Lettering
This was our first assignment in Architectural Drafting 1. Here we learned about the importance of architectural lettering and how it can affect our work. Through this practice, we got to implement the three major rules of lettering. For my bible verse, I choose Psalm 46:10, a verse that I hold very dear to my heart.
